
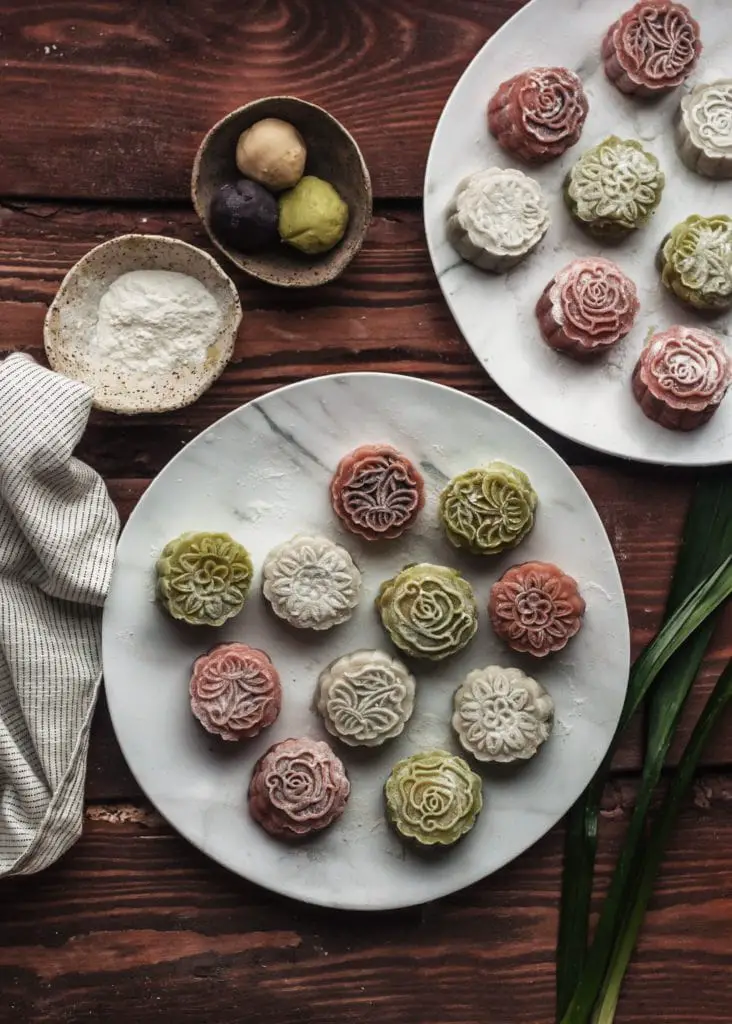
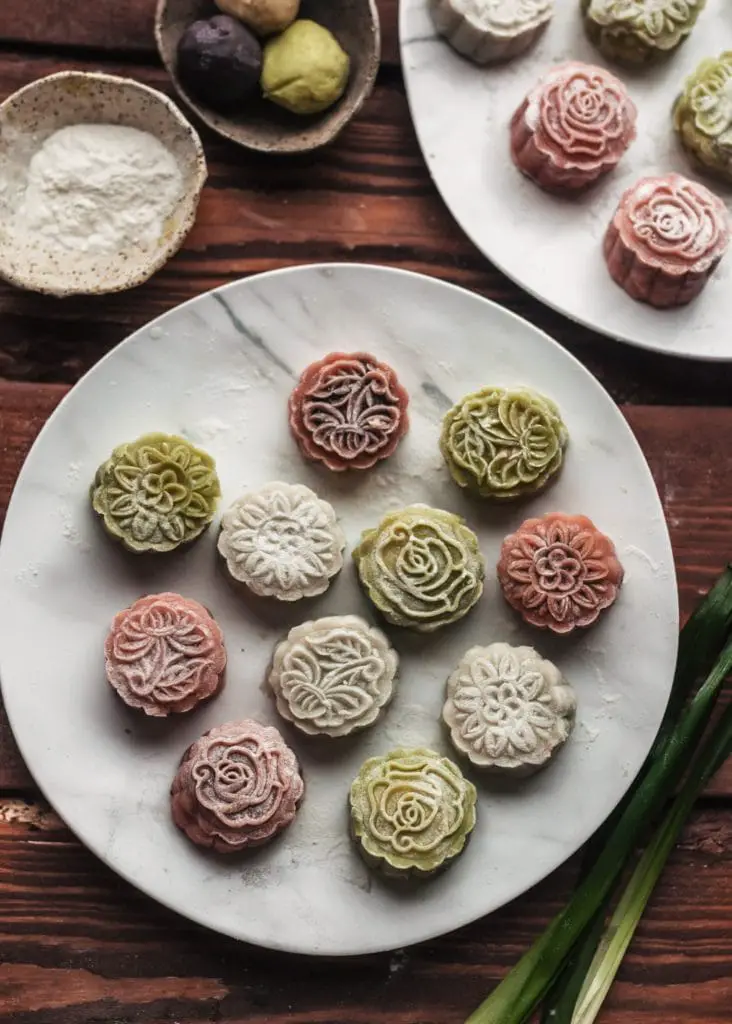
Chinese Mid-Autumn Festival (中秋节) is here! Here’s how to make snow skin mooncakes in three variations: white with matcha white bean filling, pink with purple sweet potato filling, and pandan green with white lotus seed filling.
If you’re looking for how to make traditional baked mooncakes, find the recipe here: Vegan Mooncakes (6-ways)
Mooncakes are an indispensable part of the Chinese Mid-Autumn Festival, traditionally offered to friends and family as gifts and enjoyed during the holiday festivities. There are several varieties of mooncakes, usually baked, with sweet and savory fillings.
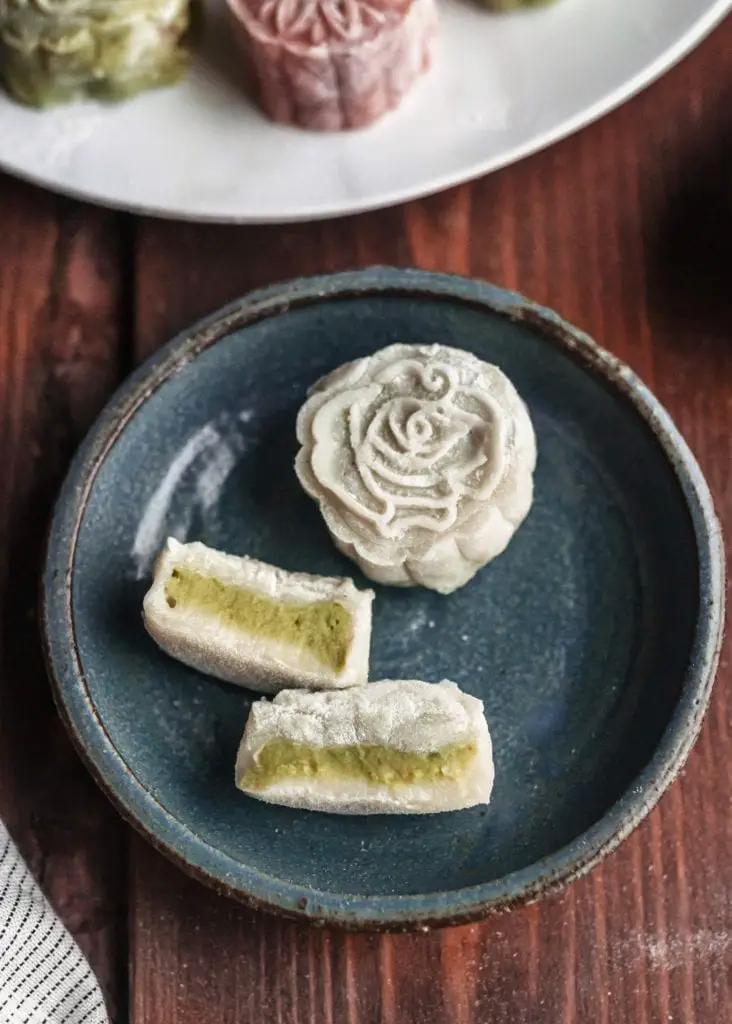
This snow skin variation, originating in the Southeastern region of China, is made with a delicate mochi-like dough and tinted with various colors. Stuffed with creamy fillings ranging from red bean to melon to lotus seed to custard, they have a soft and chewy texture and are usually served chilled.
I find snow skin mooncakes a lot easier to attempt than traditional mooncakes and unlike the baked variety they’re naturally gluten-free. The delicate stamped designs and vivd hues make for eye-catching gifts if you want to share them with friends (or save them for yourself— they freeze well and can be thawed and enjoyed in the future).
To make the mooncake skin:
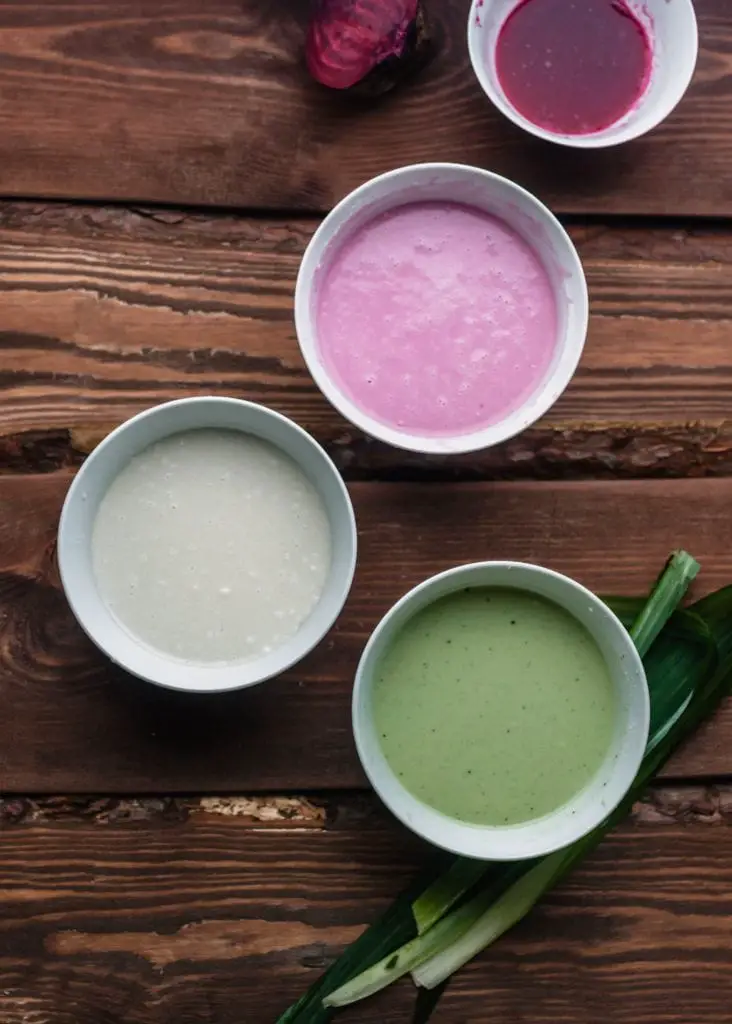
Combine sweet rice flour, white rice flour, and wheat starch in a shallow, heat-proof bowl. Add soy milk, sugar, and oil, and stir with a whisk until no lumps remain. Let rest for 30 minutes. (For the two color variations see notes in instructions below.)
Note: wheat starch is also called cheng fen (澄粉) and can be found in most Asian grocery stores. Despite the name, it’s actually gluten-free, as wheat starch is the pure starch that’s left over when you isolate/remove wheat gluten from wheat flour. You can also substitute potato starch or cornstarch if you can’t find it, but wheat starch has a distinct quality that lends more structure to the finished mooncake.
Steam over a pot of water for 25-30 minutes (depending on the depth of the bowl), until it becomes slightly translucent. Remove from heat and stir vigorously, then invert onto an oiled surface or a piece of parchment paper, and knead (either folding with a spatula or with gloved hands) until smooth and elastic. Place in the refrigerator to harden for at least two hours.
Make the dusting flour:
In a medium pan, cook the dry sweet rice flour on medium-low heat until the flour becomes a light yellow. Remove from heat and set aside to cool. (You could skip this step and just use powdered sugar or cornstarch to dust, but toasted rice flour is more traditional.)
Prepare the filling:
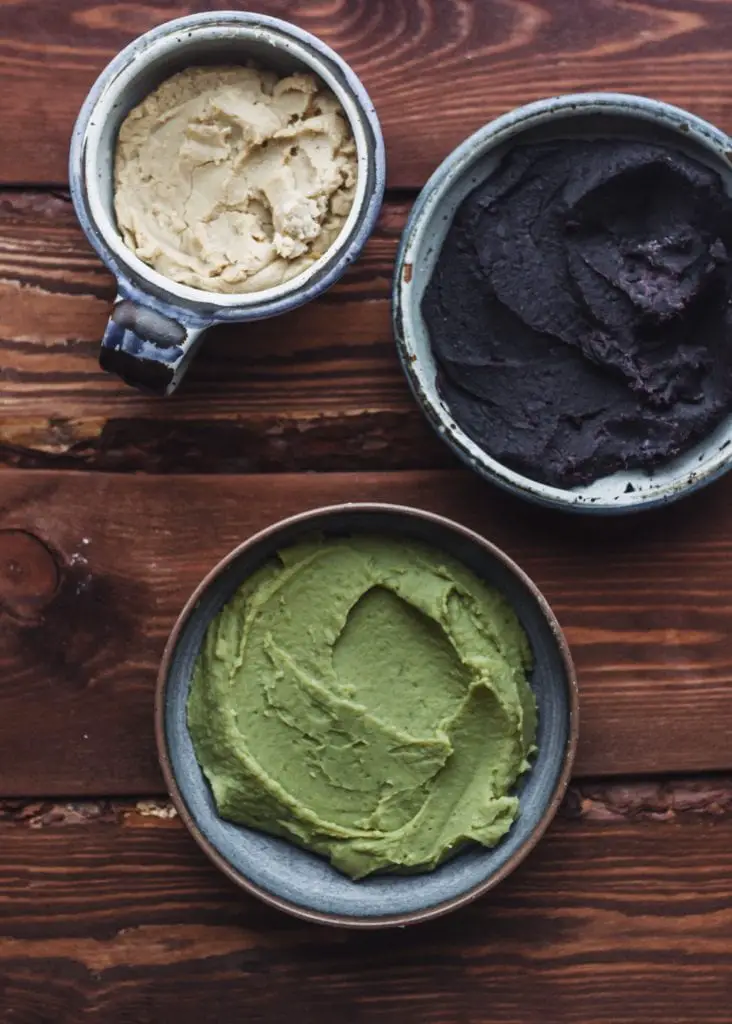
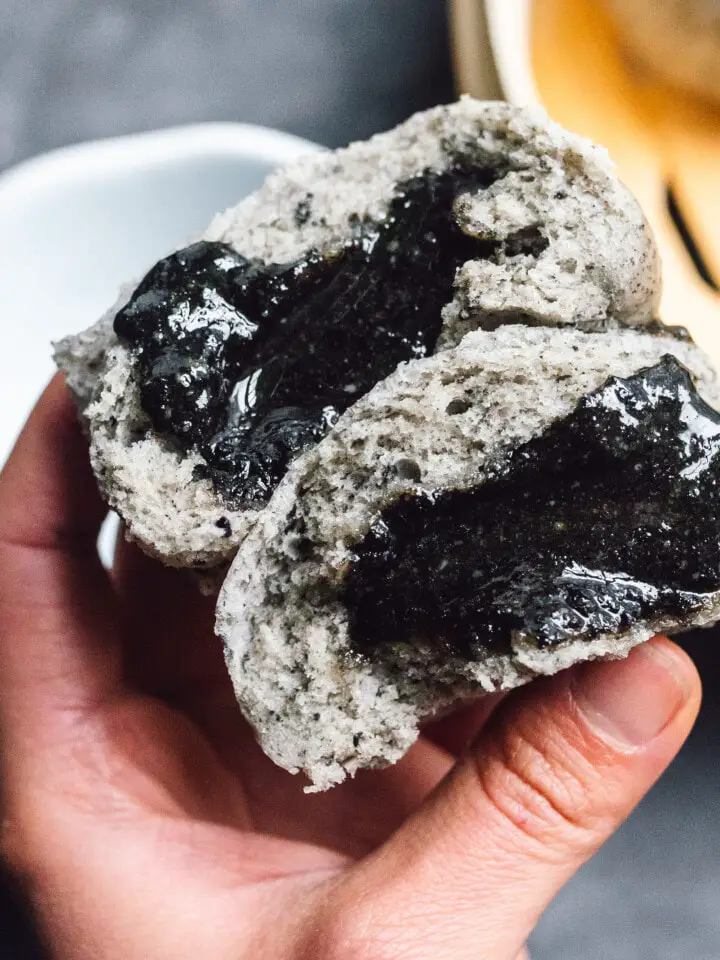
You can use store-bought red bean paste, custard, lotus seed paste, melon paste, mung bean paste, etc. but I’ve included instructions for three homemade fillings: lotus seed paste, purple sweet potato paste, and white bean paste (tinted with matcha).
Drain the cooked beans (or sweet potatoes) and place in a food processor, blending with a bit of water until smooth, then pour the purée into a medium saucepan, add the sugar and a pinch of salt, and cook over medium heat, stirring continuously until most of the water has been cooked away and the purée has thickened to a consistency similar to hummus. Add coconut oil and stir well, continuing to cook over medium heat until the purée becomes glossy and forms a soft dough that sticks to the spoon in one mass, about 4 to 5 minutes. Remove from heat and chill until ready to use.
To assemble mooncakes:
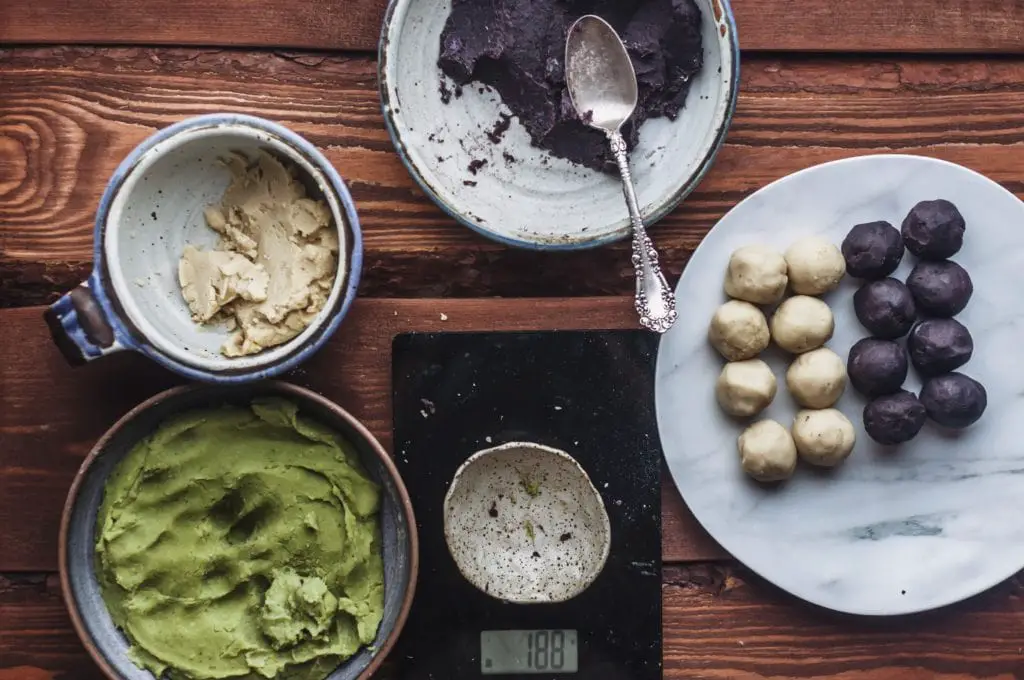
Divide both filling and dough into portions of 25 grams each, and shape into balls. (My mooncake stamp is for 50g mooncakes, half filling and half dough).
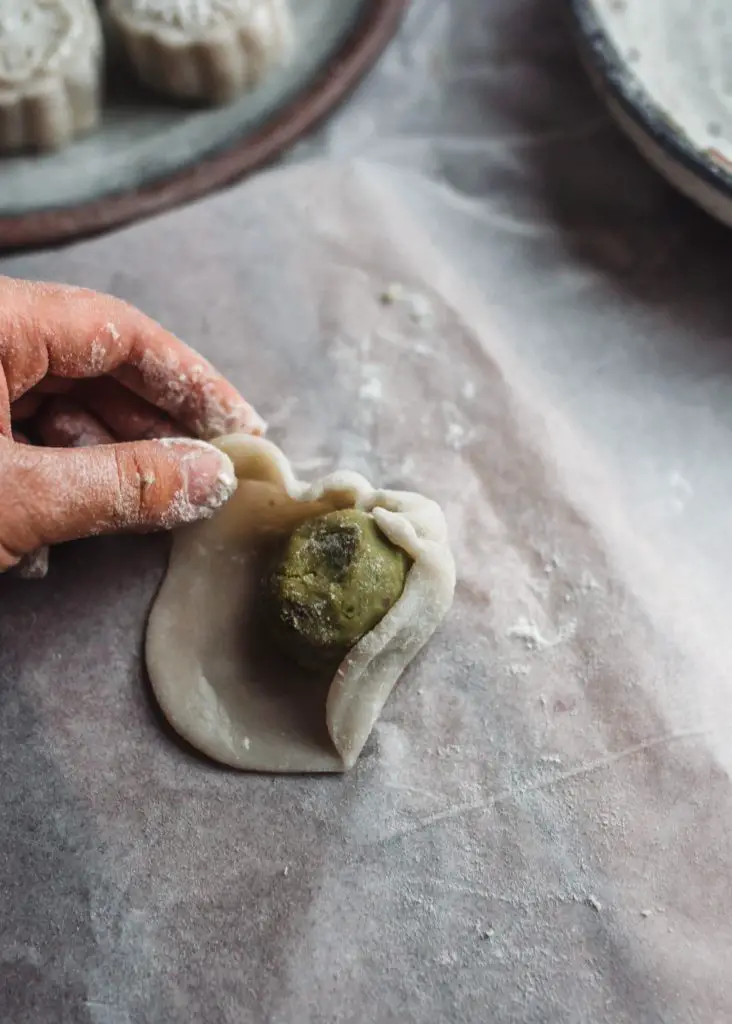
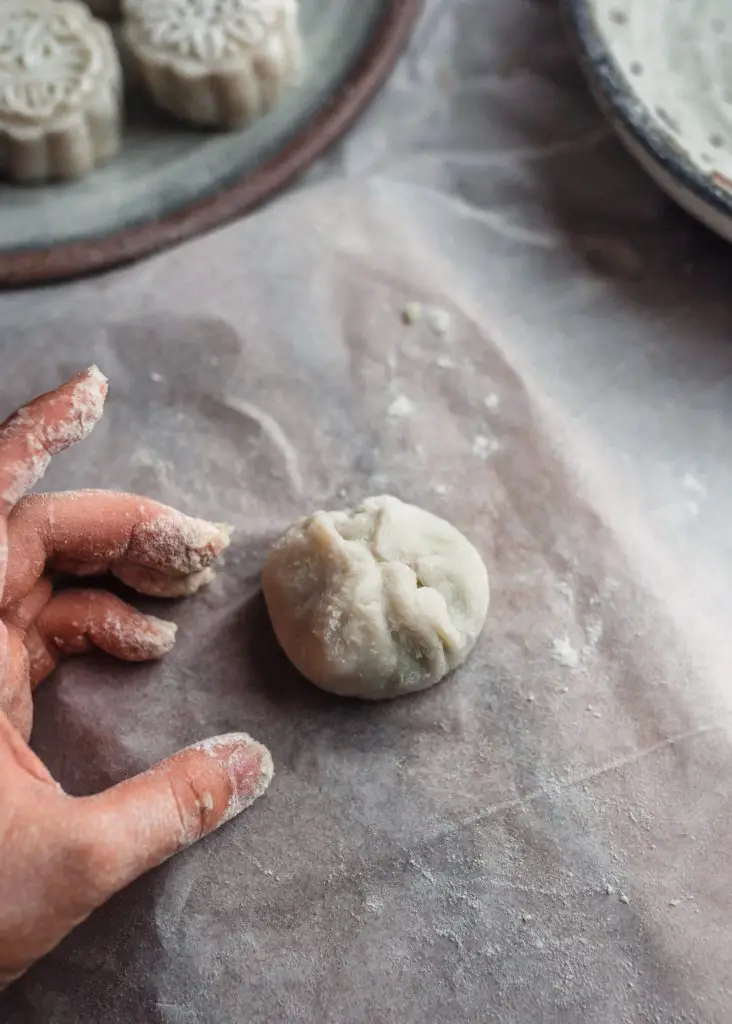
Flatten a piece of dough onto a sheet of parchment paper, place another piece of parchment paper on top, and roll out gently into a round. Uncover and place a ball of filling in the center of the round, then gently wrap the dough upwards and around the filling, pinching edges at the top to seal. (Coat your fingertips liberally with the dusting flour to prevent sticking!)
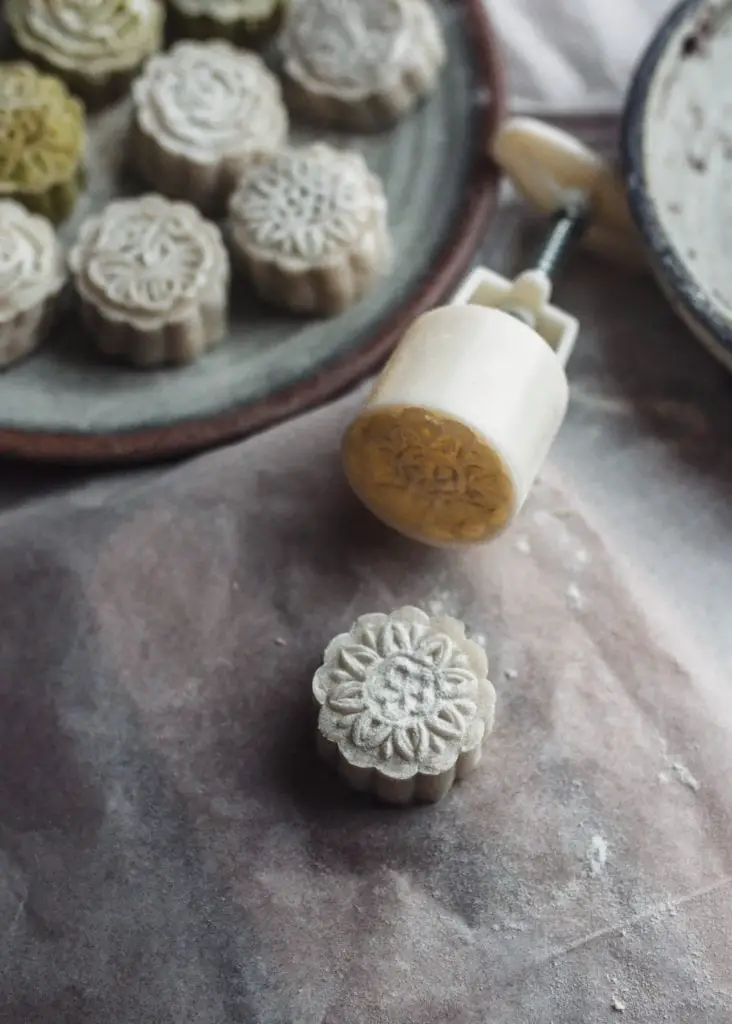
Dust the mooncake stamp with flour, then shake to remove excess. Place the ball into the mooncake mould, stamp firmly, and push gently to remove. If you find the mooncake is sticking, you may need to dust the stamp with more flour, especially in the crevices.
And that’s it! The mooncakes taste best after chilled in the fridge. You can store them in an airtight container in the fridge for up to 3 days, or freeze individually for frozen mochi treats.

tips for making these mooncakes:
- Chill the dough for at least two hours to harden it (if you’re in a hurry, pop it in the freezer). I cannot emphasize this enough; if you don’t chill the dough it will be impossibly soft and sticky to work with.
- If you find your fingers are still sticking to the dough, coat them liberally with dusting flour.
- The mooncake press that I use can be found here. The wrapper to filling ratio is 1:1; my press is for 50g so I weighed out balls of 25g filling and 25g dough.
- I used refined coconut oil for the filling (refined doesn’t have a coconut flavor), but any neutral tasting oil should work.
- Each batch of dough makes 12 mooncakes. You’ll probably have leftover filling (but that’s never a bad thing amirite). I made 3 batches with 3 different fillings.
If you made these mooncakes let me know how you liked them by leaving a comment and a rating below! Also be sure to follow along on Pinterest and Instagram for all my recipes and latest posts.
Print📖 Recipe
Snow Skin Mooncakes 冰皮月饼 (Vegan)

Soft and chewy snow skin mooncakes with an irresistible creamy filling: a delicate treat for Mid-Autumn Festival.
- Prep Time: 60
- Cook Time: 30
- Total Time: 1 hour 30 minutes
- Yield: 12 mooncakes 1x
- Category: Desserts and Sweets
- Method: No Cook
- Cuisine: Chinese
Ingredients
Mooncake Skin
- 45g (5 tbsp) sweet/glutinous rice flour (nuo mi fen, 糯米粉)
- 35g (3 ½ tbsp) white rice flour (zai lai mi fen, 在来米粉/粘米粉)
- 20g (2 heaping tbsp) wheat starch* (cheng fen, 澄粉)
- 40g (3 tbsp) sugar
- 185g (¾ cup) unsweetened soy or almond milk
- 20ml (1 ½ tbsp) vegetable oil
Choose one of the following fillings to make: White Bean Paste
- 2 15-oz cans white kidney/cannellini beans, rinsed and drained
- ¼ cup + 2 tbsp sugar, or to taste
- pinch of salt
- 1 tsp matcha powder (optional)
- 4 tbsp refined coconut oil
Purple Sweet Potato Paste
- 400g (2 large) purple sweet potatoes, cooked and peeled
- ½ cup sugar, or to taste
- pinch of salt
- 3 tbsp refined coconut oil
White Lotus Paste
-
2 cans lotus seeds in water, drained (2 cups)
-
¼ cup + 2 tablespoon sugar, or to taste
- pinch of salt
- 2 tbsp refined coconut oil
Dusting flour:
- ¼ cup sweet rice flour
Instructions
Make wrapper dough:
- Combine sweet rice flour, white rice flour, wheat starch, and sugar in a shallow, heat-proof bowl. Add soy milk and oil, and stir with a whisk until no lumps remain. Let rest for 30 minutes. Steam in a steamer over boiling water for 25-30 minutes (depending on the depth of the bowl), until dough becomes slightly translucent.*
- Remove from heat and stir vigorously, then invert onto an oiled surface or a piece of parchment paper, and knead (either folding with a spatula or with gloved hands) until smooth and elastic. Place in the refrigerator to harden for at least two hours.
To make filling:
- White bean matcha paste: drain the cooked beans and place in a food processor, blending until smooth. You may need to add 2 or 3 tablespoons of water in this step. Pour the purée into a medium saucepan, add the sugar and a pinch of salt, and cook over medium heat, stirring continuously until most of the water has been cooked away and the purée has thickened to a consistency similar to hummus. Add coconut oil and matcha powder and stir well, continuing to cook over medium heat until the purée becomes glossy and forms a soft dough that sticks to the spoon in one mass, about 4 to 5 minutes. Remove from heat and chill until ready to use.
- Purple sweet potato paste: steam purple sweet potatoes until tender. I used my Instant Pot to cook them (set to 15 minutes on HIGH + natural pressure release). Peel and cut into small cubes, then place in a food processor with a few tablespoons of water, blending until smooth. Pour the sweet potato purée into a medium saucepan, add sugar and a pinch of salt, and cook over medium heat, stirring continuously until most of the water has been cooked away. Add coconut oil and stir well, continuing to cook over medium heat until the purée becomes glossy and forms a soft dough that sticks to the spoon in one mass, about 4 to 5 minutes. Remove from heat and chill until ready to use.
- White lotus seed paste: drain the cooked lotus seeds and place in a food processor, blending until smooth. You may need to add 2 or 3 tablespoons of water in this step. Pour the purée into a medium saucepan, add the sugar and a pinch of salt, and cook over medium heat, stirring continuously until most of the water has been cooked away and the purée has thickened to a consistency similar to hummus. Add coconut oil and stir well, continuing to cook over medium heat until the purée becomes glossy and forms a soft dough that sticks to the spoon in one mass, about 4 to 5 minutes. Remove from heat and chill until ready to use.
Make dusting flour:
- In a medium pan, toast the sweet rice flour on medium-low heat until the flour turns light yellow. Remove from heat and set aside to cool.
To assemble mooncake:
- Divide the cold mochi dough into 12 equal pieces, 25g each. Shape the cooled filling into 12 balls of equal size, 25g each (you will have filling leftover). I use a small kitchen scale to weigh each portion for consistency.
- Flatten a piece of dough onto a sheet of parchment paper, place another piece of parchment paper on top, and roll out gently into a round. Uncover and place a ball of filling in the center of the round, then gently wrap the dough upwards and around the filling, pinching edges at the top to seal. (Coat your fingertips liberally with the dusting flour to prevent sticking!)
- Dust the mooncake stamp (the mini mooncake size is for 50g) with flour, then shake to remove excess. Place the ball into the mooncake mould, stamp firmly, and push gently to remove. If you find the mooncake is sticking, you may need to dust the stamp with more flour, especially in the crevices.
- The mooncakes taste best after being chilled in the fridge. Store in an airtight container for up to 3 days, or freeze them for long-term storage (enjoy after thawing).
Notes
- *Wheat starch is also called cheng fen (澄粉) and can be found in most Asian grocery stores. Despite the name, it’s actually gluten-free, as wheat starch is the pure starch that’s left over when you isolate and remove all the wheat gluten from wheat flour. You can also substitute potato starch or cornstarch if you can’t find it.
- To make pink mooncakes: grate half a fresh beet (or blend in a food processor) and press the juice into a small dish. Measure out almond milk as written, but remove 1 tablespoon and replace it with the beet juice to color the milk before adding it to the batter.
- To make green mooncakes: you can either add 1 teaspoon matcha powder or use pandan leaves: cut up 4 fresh (or thawed from frozen) pandan leaves and pulse in a food processor with 2-3 tablespoon of almond milk, then strain this mixture to remove the pulp from the leaves. This will serve as the green food coloring. Measure out almond milk for the recipe as written, but replace 2-3 tablespoon of the milk with the green coloring.
- *Instant Pot cooking option for mochi dough: place bowl on steamer rack in an Instant Pot and set to HIGH for 1 minute, and let natural release.

June Liew says
Hi Hannah,
Your blog is so beautifully written! I have yet to try your recipes but is “sweet rice flour” easy to find? I have seen rice flour but have not come across any “sweet” rice flour before. Is this product readily available? Where can I get it?
Hannah says
Hi! Sweet rice flour is also called sticky rice or glutinous rice flour and it results in a mochi-like texture, definitely not the same as rice flour. You can find it in any Asian grocery store!
Stephanie says
I am so excited to try out your recipe! Do you know if I can replace the wheat starch with arrowroot powder or tapioca flour instead of cornstarch? My family can’t do gluten and corn so I’m always looking to figure out how to replace these.
Hannah says
Hi Stephanie, yes I’d actually recommend potato starch as it’s closest, but I think tapioca starch would be the next best bet! It’ll just make the skin softer. PS wheat starch actually doesn’t contain gluten (the starch is the byproduct of removing all the gluten from wheat flour), so it’s good for gluten-free people. But in any case the subs I mentioned should work; let me know how it goes!
Chloe says
Hi, I’m loving this recipe so far and I’m planning to make it! Do you know how long the mooncakes can be kept in the freezer?
★★★★★
Hannah says
Yay hope you enjoy it! And they will keep in the freezer for over a month 🙂
Krystal says
Hi,
Where can you find/buy a mooncake mold/stamp?
Will these mooncakes last unrefrigerated for days if shipped?
Thank you.
Hannah says
I got mine online (from amazon) but I’ve seen some Asian grocery stories carry them. And unfortunately no, snowskin mooncakes are more delicate than regular baked ones so they have to be refrigerated (or shipped in cold/insulated packaging).
Christie says
Hi! I am so excited to try this recipe! Could I ask, what is the purpose of the oil used in the skin? Can it be omitted? Thank you!
Hannah says
Hi! The oil is for texture (makes the dough more pliable/easier to work with) as well as appearance (for a more lustrous, translucent delicate skin). I haven’t tried omitting it before and wouldn’t necessarily recommend it, but I think it could still work 🙂
Catherine says
Hi! Thanks for this recipe. Can I chill the Mochi dough for a full night and day in fridge? Is that too long? I just made the dough, but it’s late at night over here. I can’t assemble it all til tomorrow night.
Hannah says
Yes that should be no problem!
Anonymous says
Thank you! By the way, I just noticed a mistake in the ingredient list for the white beans. It says 1/4 + 2 TBS sugar but I think you mean 1/4 cup. I made these and we devoured them. So delicious!! Thank you for the recipe.
Hannah says
so glad to hear! and fixed, thank you x
John says
Hi Hannah, I’m excited to make these. I’d love to try the lotus seed variety, but I searched for lotus seed on Instacart/HMart and Amazon – neither returned any results. Does HMart normally have it? I imagine they might be out of stock because of the holiday. I’m shopping two days before the mid-autumn festival. 🙂
Hannah says
Hi John — Hm, yes Hmart should have them in the canned item section! If you can’t find canned lotus seeds though, you can buy dried lotus seeds, which are almost always available— just soak them overnight and cook until they’re tender, like boiling dried beans. You just need 2 cups cooked to substitute in the recipe.
John says
Hi Hannah, if I don’t have a steamer, is there a way to make the dough?
Hannah says
You can use a microwave! Put the dough in a bowl and cover with some plastic wrap (loosely, not too tight). Microwave on high heat (1100w) for 1 minute, then take it out and stir with a wet rubber spatula. Cover again and cook for 1 minute. Repeat one more time. Finally, stir again, cover, and cook for 30 seconds to finish cooking. The color of the mochi should change from white to almost translucent— if it isn’t translucent yet, repeat the 1 minute nuking again.
MaTaylie Myoshi Beganovic says
I don’t suppose you make these and sell them?! I would definitely buy if you did!😊. They look soo delicious!!!
★★★★★